What You Do in the First 48 Hours Can Make or Break Your Claim
Insurance adjusters handle dozens of storm claims at once after a major weather event. They're moving fast, and their job — frankly — is not to find every piece of damage on your roof. It's to document what they can verify. If you haven't done your own documentation first, you're walking into that inspection at a disadvantage.
This is one of the things we see play out again and again across Green Bay and Northeast Wisconsin. A homeowner has real storm damage, calls their insurance company, an adjuster visits, and the payout comes back lower than expected — sometimes far lower. The damage was there. The documentation wasn't.
The good news is that doing this right isn't complicated. It takes a few hours, a smartphone, and a methodical approach. Here's exactly how to do it.
Step 1: Tie the Damage to a Specific Storm Date
This sounds obvious, but it's the step most homeowners skip. Insurance claims are event-specific. You need to connect the damage on your roof to a weather event that can be verified by third-party records.
Start by writing down the date and approximate time the storm hit. Then gather at least one of the following:
- A screenshot from a weather app showing severe weather in your area on that date
- A National Weather Service (NWS) storm report — these are publicly available at weather.gov and document hail size, wind speed, and storm path for specific dates and regions
- A local news story covering the storm
- Photos or videos you took during or immediately after the storm
Your insurance company will pull NWS data when they evaluate your claim. You should have the same records they do. If the storm produced hail, note the reported hail size — adjusters use this when assessing whether damage is consistent with the event.
If you collected hail from your yard or driveway, photograph it next to a coin or ruler for scale before it melts. A golf ball-sized hailstone and a marble-sized one do very different things to a shingle, and documenting what you actually got matters.
Step 2: Create a Dedicated Photo Folder Before You Take a Single Shot
Organization sounds like housekeeping, but it becomes important when you're submitting a claim weeks after the storm. Create a folder on your phone specifically for this claim, named with the storm date and your address. Everything goes in there.
Then make sure your phone's location services and timestamp metadata are turned on. Most modern smartphones embed GPS coordinates and timestamps in photo metadata automatically — this gives your photos built-in documentation of when and where they were taken, which adds credibility to your evidence.
Now you're ready to photograph.
Step 3: Photograph the Soft Metal Surfaces First
Before you look at the roof, spend 15 minutes photographing every soft metal surface around your home. This is the most underused documentation technique homeowners have, and it's genuinely powerful.
Hail leaves unmistakable marks on soft metals: aluminum window trim, gutters, downspouts, AC condenser fins, outdoor HVAC covers, metal roof vents, and flashing. These surfaces don't fake damage — a circular dent from a hailstone is distinctly different from a scratch or a scuff. Insurance adjusters know this, which is why they often use metal surfaces as a baseline to confirm that a specific storm actually hit your property with meaningful force.
Photograph every metal surface you can find. Get close-up shots that show individual dents clearly, and wide shots that show the broader context. Your gutters deserve particular attention: photograph the outer face for dents, the interior channel for accumulated granules, and the discharge area at the base of each downspout.
A lot of granule accumulation in your gutters after a storm is meaningful evidence. Granules are the mineral coating on the surface of asphalt shingles — they protect the asphalt layer from UV degradation. When hail knocks them loose, they wash down into the gutters. New roofs shed almost none. A post-storm surge is a clear indicator of impact damage.
Step 4: Document the Roof From the Ground
Do not get on your roof before a professional inspection. This isn't just a safety warning — it's practical advice. Walking a potentially damaged roof without knowing what you're dealing with can worsen the damage and, in some cases, give an insurance company grounds to dispute the cause.
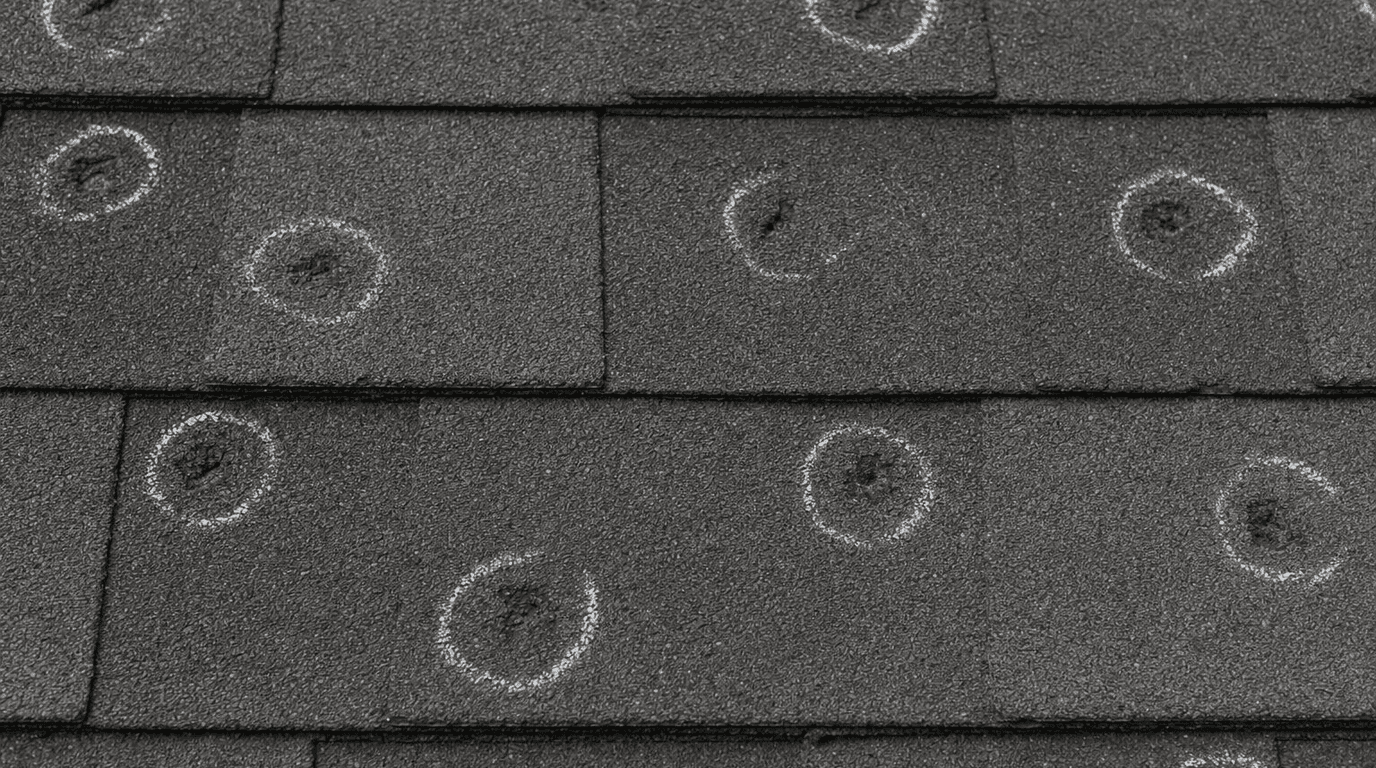
You can get a lot done from the ground. Walk the full perimeter of your home and photograph each roof plane from multiple angles. Try to do this when the sun is hitting the roof at a low angle — raking light shows surface depressions and bruising that are invisible when the sun is directly overhead.
Look for:
- Dark patches or spots that look different from the surrounding shingles
- Areas where the shingle surface appears matte or dull compared to the rest (granule loss changes how shingles reflect light)
- Visible cracking, splitting, or displaced shingles
- Ridge cap shingles that look broken or shifted
- Any lifted or missing shingles
With binoculars, you can often spot hail bruising patterns — clusters of circular depressions concentrated on exposed shingle faces. The pattern follows the direction the hail was traveling, which also helps establish storm consistency.
If you experienced wind damage alongside the storm, look for shingles with lifted corners, missing tab sections, or debris embedded in the roof surface. Wind damage is often more immediately visible than hail damage but equally important to photograph before weather conditions change.
Step 5: Document the Interior of Your Home
Insurance claims for roof damage aren't limited to what's happening outside. Interior evidence is part of the picture too.
Walk through every room and look at the ceiling. Photograph any water staining, soft spots in drywall, or bubbling paint — even if these are old stains, document them with a note that they pre-date the storm. You're establishing a baseline.
If you have attic access, go up there with a flashlight and photograph any daylight visible through the roof deck, water staining on the rafters or sheathing, wet insulation, or mold growth. Water intrusion in the attic often shows up before it reaches your ceiling below, and attic photos can be compelling evidence that the roof has been compromised.
Check your insulation too. Wet insulation has a different texture and color than dry insulation. If you see it, photograph it.
Step 6: Get a Professional Inspection Before the Adjuster Shows Up
This is the step that makes the biggest difference, and the one homeowners are most likely to skip.
A professional roofing inspection done before the insurance adjuster visit gives you an independent, documented assessment of what's actually damaged. A written inspection report from a licensed contractor creates a record that the damage existed before the adjuster's visit — which matters if the adjuster misses something or if you need to dispute a low estimate later.
More practically: having a contractor present during the adjuster's inspection keeps the process thorough. An experienced roofer knows what adjusters look for, what they sometimes overlook, and how to point out damage in terms that translate directly into a claim. This isn't about gaming the system. It's about making sure the full scope of your actual damage gets documented accurately.
At Pierce Roofing, our storm damage inspection process is built around insurance claims. We've worked through hundreds of them across Brown, Kewaunee, Oconto, Outagamie, Winnebago, and Manitowoc counties. We know how to document what we find in writing, and we know how to work alongside adjusters so the process goes smoothly.
If hail was the primary cause, our hail damage roof repair team can assess the specific type and extent of impact damage across different roofing materials — asphalt, metal, flat membrane, and others. Not all damage looks the same, and the documentation needs to reflect what your specific roof experienced.
What NOT to Do Before Your Claim Is Filed
A few common mistakes that cost homeowners money:
Don't make permanent repairs before the adjuster sees the damage. Emergency tarping or temporary patching to prevent further damage is fine and usually required by your policy. But don't replace shingles, repair flashing, or do any work that changes what the adjuster would see. If you do make emergency repairs, photograph everything before and after, and keep all receipts.
Don't let a storm chaser do your initial inspection. After major weather events, contractors from out of state flood the area offering free inspections. Some of them do legitimate work. But an inspector with no local roots and no ongoing accountability in your community isn't who you want holding your claim documentation. Use a local contractor with a track record.
Don't wait too long. Wisconsin homeowners are generally expected to report storm damage within a reasonable timeframe after the event. What counts as "reasonable" varies by policy, but letting a claim sit for six months while damage worsens is not going to help. File promptly.
Don't skip reading your policy first. Before you call your insurance company, spend 20 minutes with your homeowner's policy. Know your deductible, know whether your policy covers actual cash value (ACV) or replacement cost value (RCV), and know the reporting deadlines. These details affect what you should expect.
What Happens After You File
Once you file a claim, your insurance company will assign an adjuster. You have the right to have your contractor present during that inspection — and you should exercise it.
If the adjuster's estimate comes in lower than your contractor's assessment, you can dispute it. The process for this varies by insurer, but having a written inspection report from a reputable local contractor is your strongest tool. Some policies also include a provision for an independent umpire or appraisal process if you and the insurer can't agree.
After the claim is approved, you'll receive either an ACV payment (which accounts for depreciation) or an RCV payment (which covers full replacement cost). If your policy pays ACV initially, you typically receive the depreciation holdback once the work is completed and you submit proof.
Work with a contractor who understands this process and communicates with your insurance company directly when needed. It takes paperwork and follow-up, and a good contractor makes that easier.
Free Roof Inspection in Green Bay and Northeast Wisconsin
If you're not sure whether a recent storm did damage to your roof, the most straightforward thing to do is get a professional set of eyes on it. We offer free roof inspections across all six counties we serve — no obligation, no sales pressure, just an honest assessment of what we find.
Michael Pierce has been doing this for over 30 years. We're Atlas PRO+ Platinum certified, carry $2 million in insurance, and back every job with a 10-year workmanship warranty. When we finish an inspection, you'll have a written report you can use however you need to — including for your insurance claim.
Call us at (920) 609-8304 or request a free estimate online. We'll get out there, tell you exactly what we see, and help you figure out the right next step.