The Part of Your Roof Nobody Talks About
Most homeowners can point to their shingles and name them. Some know what flashing is. But drip edge — the metal strip that runs along every eave and rake on your roof — gets almost no attention, even though it's doing critical work every single time it rains or snows.
Ask a homeowner in Green Bay what drip edge is, and there's a good chance they'll shrug. That's understandable. It's not visible from the street. It's not dramatic. But if it's missing, installed wrong, or skipped by a crew trying to cut corners, you'll end up with rotted fascia, damaged gutters, and water finding its way into places it absolutely should not be.
Here's exactly what drip edge is, what it does, and why it matters more in Wisconsin than it does almost anywhere else.
What Is Drip Edge on a Roof?
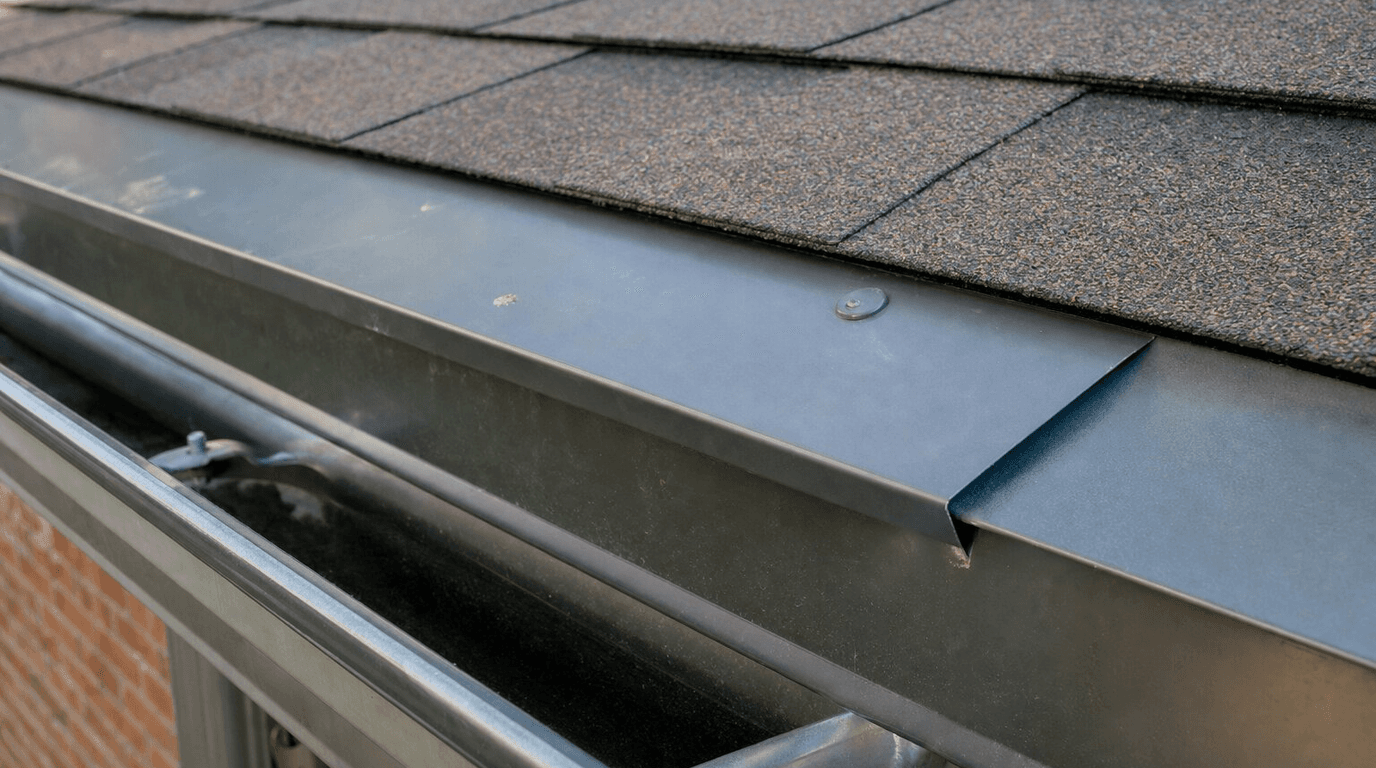
Drip edge is a strip of formed metal — usually galvanized steel or aluminum — that's installed along the edges of a roof deck before the underlayment and shingles go on. It's shaped with a small outward lip that directs water away from the fascia board and into the gutter below.
That's the basic definition. But the job it actually performs is a little more involved.
Without drip edge, rainwater and snowmelt running off your roof doesn't cleanly drop into the gutter. Instead, it follows the path of least resistance — which often means running back underneath the roofing material, saturating the edge of the roof deck, and soaking into the fascia. Wood does not handle prolonged moisture well. Neither does the soffit behind it. Over time, that repeated wetting and drying cycle causes rot, and rot spreads.
Drip edge solves this by creating a physical barrier. Water hits the metal lip, gets pushed outward, and falls into the gutter where it belongs. Simple in concept. Significant in effect.
Where Drip Edge Gets Installed
There are two locations on a roof where drip edge is installed, and the installation sequence is different for each.
Along the eaves (the horizontal lower edges of the roof), drip edge goes down before the underlayment. This placement lets the underlayment lap over the top of the drip edge, so any water that gets under the shingles runs over the metal and into the gutter rather than behind it.
Along the rakes (the angled edges on a gabled roof), drip edge goes on after the underlayment. The underlayment tucks under the rake drip edge so water coming off the side of the roof gets pushed outward instead of running back down the face of the fascia.
Get those sequences backwards and you've created water entry points that will be invisible until they've done damage. It's one of those details that sounds minor until you've spent a few thousand dollars on fascia replacement and realized the drip edge was installed upside-down on a re-roofing job ten years ago.
A proper roof installation gets this right the first time, every time. It's worth asking any contractor you're considering whether they follow the manufacturer's installation guidelines on drip edge placement — because some don't.
Why Wisconsin Makes This More Important Than Average
Drip edge matters everywhere. But in Northeast Wisconsin, it matters more. Here's why.
Snowmelt is relentless. From January through March, your roof goes through repeated freeze-thaw cycles. Snow melts during the day, refreezes at night, and that expanding ice pries at any gap it can find. Without drip edge sealing the roof edge, that meltwater has easy access to the fascia and roof deck.
Ice dams start at the eaves. Ice dams form when heat escaping through the roof melts snow near the ridge, and that water runs down and refreezes at the cold eaves. Drip edge alone won't prevent ice dams — that's a ventilation and insulation problem — but it does help ensure that water backing up behind an ice dam has one less pathway into the structure. Combined with ice-and-water shield underlayment at the eaves, it's part of a system that actually works.
Wind-driven rain hits hard. Spring storms in the Green Bay area bring rain at a sharp angle. Wind-driven rain doesn't just fall on your shingles; it gets pushed horizontally under eave overhangs and against fascia boards. Drip edge gives that water nowhere to go but the gutter.
Gutters take more abuse here. Heavy snow loads and ice formation at the gutter line are a Wisconsin reality. A gutter that's being pushed or pulled by ice needs proper drip edge behind it to ensure the roof deck isn't exposed when the gutter shifts. This connection between the roof edge and gutters is one that often gets overlooked during installation.
For more on how water finds its way into Wisconsin roofs, our post on common causes of roof leaks in Wisconsin covers the full picture.
Is Drip Edge Required by Code?
Yes — and has been for over a decade nationally. The International Residential Code (IRC) requires drip edge on all new roof installations and re-roofing projects. Wisconsin follows the IRC, and most local jurisdictions in Brown County and the surrounding area have adopted these requirements.
Beyond the code requirement, Atlas — the manufacturer whose shingles we install as an Atlas PRO+ Platinum certified contractor — requires drip edge as part of a valid installation. Skip it, and you may void the shingle warranty. That's not a small thing when you're talking about a 30-year architectural shingle.
Some cut-rate contractors skip drip edge because it adds material cost and installation time. If a quote comes in significantly lower than others and you can't figure out where the savings are coming from, it's worth asking directly whether drip edge is included.
What Happens When Drip Edge Is Missing or Done Wrong
The damage doesn't always show up fast. That's part of what makes missing drip edge so insidious.
Year one or two, nothing looks wrong. The fascia is still painted, the gutters hang straight, the shingles look fine. But every rainstorm, every snowmelt cycle, a small amount of water is finding its way behind the gutter and into the edge of the roof deck. By year five or six, the fascia is starting to show soft spots. By year ten, you're looking at rotted fascia, compromised soffit, and possibly damaged roof deck at the edges — all of which needs to come out and be replaced before new roofing can go on.
We've seen this on re-roofing jobs where the previous contractor installed everything else correctly but skipped the drip edge. The shingles look reasonable. But pull off the old roofing along the eaves and the wood underneath is dark, soft, and sometimes actively crumbling. That becomes additional repair cost on top of the roofing job itself.
Proper asphalt shingle roofing accounts for this at every step. The materials are only as good as the installation beneath them.
What Drip Edge Installation Actually Looks Like
For a standard re-roofing job, here's the basic sequence:
- Old shingles and underlayment come off down to the deck.
- Deck is inspected for rot or damage and repaired where needed.
- Eave drip edge goes on along the lower edges, nailed to the deck.
- Ice-and-water shield goes down at the eaves (in Wisconsin, minimum three feet from the edge, or to the warm wall of the house — whichever is further).
- Felt or synthetic underlayment covers the rest of the deck, lapping over the eave drip edge.
- Rake drip edge goes on along the gable edges, over the underlayment.
- Shingles are installed starting at the eaves and working upward.
That sequence isn't optional. Each step protects the one before it. When contractors skip steps or change the order to save time, those decisions show up later as leaks or structural damage.
Should You Get Your Drip Edge Checked?
If your roof is more than 10 years old and you don't know whether drip edge was installed — or installed correctly — it's worth finding out. Not because the answer is necessarily bad, but because knowing for sure puts you in a better position before any re-roofing conversation.
Look at your roof from the ground along the eave line. You should be able to see a thin metal strip just above the top edge of your gutters. If you see only shingles hanging over the gutter with no metal visible, drip edge may be missing or improperly installed.
A free roof inspection will confirm exactly what's there and what shape it's in, along with everything else going on with your roofline, flashing, and shingles.
One More Thing Worth Knowing
Drip edge connects directly to how your gutters perform. When it's installed correctly, water flows cleanly off the roof, over the drip edge lip, and into the gutter. When it's not, water hits the back of the gutter, runs behind it, and saturates the fascia the gutter is nailed to. Fascia rot eventually means gutters that sag and pull away — which creates its own drainage problems and speeds up deck damage at the eaves.
If you're dealing with gutters that won't stay straight, or fascia that's showing signs of rot, drip edge is one of the first things to check. Sometimes the gutter problem is actually a roofing problem.
Talk to a Roofer Who Gets the Details Right
At Pierce Roofing, we've been working on roofs in Green Bay and across Northeast Wisconsin for more than 30 years. The details that other contractors skip — drip edge sequence, ice-and-water shield coverage, proper flashing at every penetration — are the details that determine whether a roof lasts 15 years or 30.
Michael Pierce and his team are Atlas PRO+ Platinum certified and carry $2M in liability coverage. Every job comes with a 10-year workmanship warranty, on top of the manufacturer warranty on materials.
If you want to know exactly what shape your roof is in before the next Wisconsin winter, we offer free, no-pressure inspections. No manufactured urgency, no hard sell. Just a straight answer about what's there and what it needs.
Call us at (920) 609-8304 or schedule your free roof inspection online.