Why Most Homeowners Only Know Half the Story
Ask a homeowner what their roof is made of. Nine times out of ten, you'll hear one word: shingles. And that's understandable — shingles are what you can see, what you can point to from the driveway, what shows up on a quote line.
But shingles are just the outermost layer of a system that has six or seven components working together. And when that system fails, it's almost never just the shingles. It's usually something underneath — a layer that most homeowners have never heard of, let alone inspected.
Understanding the anatomy of a roof makes you a smarter homeowner. You'll be able to read an estimate, ask the right questions during an inspection, and spot when a contractor is cutting corners on materials that aren't visible from the ground. If you've wondered what a roofing estimate actually covers, our post on how to read a roofing estimate is worth reading alongside this one.
Let's go from the bottom up.
The Roof Deck: Your Foundation
Everything else on your roof sits on top of the roof deck — also called decking or sheathing. It's the structural base layer, almost always made from OSB (oriented strand board) or plywood panels nailed across the rafters or trusses of your framing.
The deck doesn't need to be visible to do its job, but its condition matters a lot. Soft spots, rot, or delamination in old decking can undermine even a brand-new shingle installation. When Pierce Roofing does a full roof replacement, we walk every square foot of the deck before laying anything new. Damaged sections get replaced before anything else happens. Skipping that step is how a new roof ends up with premature problems.
In Wisconsin, ice dams and chronic condensation are two of the main reasons decking deteriorates faster than it should. More on that when we get to ventilation.
Ice and Water Shield: The Layer That Saves Wisconsin Homes
Directly on top of the deck, before any felt or underlayment goes down, comes the ice and water shield — and in Northeast Wisconsin, this layer isn't optional. It's one of the most important decisions made during any re-roof.
Ice and water shield is a self-adhering membrane, typically rubberized asphalt, that bonds directly to the deck surface. It's waterproof. More importantly, it's self-sealing around nails — meaning if water gets underneath the shingles and finds a nail hole, the membrane closes around it rather than letting water through to the wood below.
Where does it go? At minimum, along the eaves (the low edges of the roof), where ice dams form. Many manufacturers require a minimum of 24 inches past the interior wall line. On a full quality installation, you'll often see it extended further: up the valleys, around chimneys and skylights, along any vulnerable transition.
If you're curious how ice dams and the roof's underlayment system are connected, we've covered that in detail in our post on ice dams and Green Bay roof protection.
Roofing Underlayment: The Backup Barrier
Above the ice and water shield (or directly on the deck in areas where the shield isn't required), roofing underlayment covers the rest of the roof surface. Think of it as a secondary weather barrier — your first line of protection if water ever makes it past the shingles.
There are two main types:
Felt underlayment (roofing felt, or tar paper) has been used for a century. It's affordable and it works. Typically 15 lb or 30 lb felt, the heavier being more durable. It's still common and there's nothing wrong with it when properly installed.
Synthetic underlayment has taken over a significant share of the market in the last decade. It's lighter, tears less during installation, handles moisture better during the installation window, and tends to have better longevity. On most of our installations, synthetic is what we use.
Either way, underlayment laps over itself in horizontal rows starting at the eave and working upward — same logic as shingles, using gravity to shed water downward. Details matter here. Insufficient lap, improper fastening, or tears that don't get addressed before shingles go on are all shortcuts that eventually show up as leaks.
Roof Decking Protection: Drip Edge and Starter Strip
Two components that don't get much attention but do important work at the edges of the roof.
Drip edge is a strip of pre-formed metal (aluminum or galvanized steel) installed along the eaves and rakes — the bottom and side edges of the roof. Its job is to guide water off the roof edge cleanly, preventing it from running back under the shingles or along the fascia board. In Wisconsin's freeze-thaw conditions, proper drip edge also helps manage ice melt at the eave. We've written specifically about why Wisconsin roofs need drip edge if you want the full picture.
Starter strip is a purpose-made row of shingle material installed at the eave before the first full course of shingles begins. It provides adhesive bonding at the very edge of the roof and fills in the gaps between the first row of shingles. Skip the starter strip (or use cut-up shingles as a substitute, which some contractors do to save money), and that bottom edge is less secure than it should be — a problem when Wisconsin winds are involved.
Shingles: The Visible Layer
Now we're at the part everyone knows. Shingles are the outermost surface of the roof, what sheds the actual rain and absorbs the UV, hail, and temperature swings year after year.
The most common type in Northeast Wisconsin is the asphalt shingle — specifically the architectural (or laminate) shingle, which has a dimensional, layered look versus the flat, three-tab style that was dominant before the 1990s. Architectural shingles are thicker, more wind-resistant, and generally carry longer warranties. Our asphalt shingle roofing page covers the specifics on shingle grades, warranties, and what goes into a quality installation.
Beyond asphalt, there are other options: metal panels and standing seam systems, flat roofing membranes, slate, and tile. Each has a different installation anatomy — but the foundational layers beneath them (deck, moisture barrier, underlayment) follow similar logic. If you're exploring what material makes sense for your home, our roofing types overview is a good starting point.
One thing worth knowing: shingle quality varies significantly within the asphalt category. A contractor who gives you a much lower bid isn't necessarily more efficient — they may be using a three-tab shingle or a builder-grade architectural that carries a 25-year warranty versus the 30- or 50-year options. It's worth asking specifically what product is being installed.
Flashing: The Weak Points, Properly Sealed
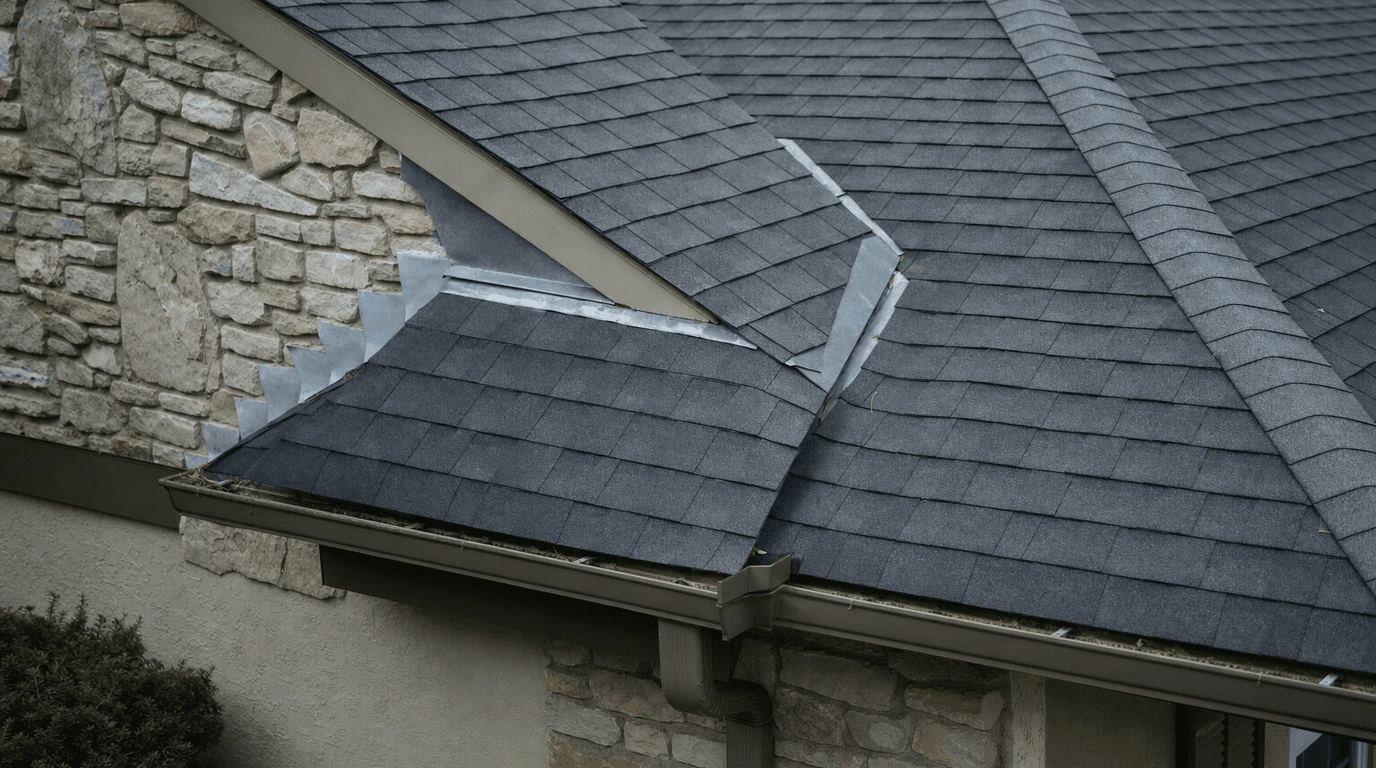
Every place on your roof where the continuous shingle surface is interrupted — every chimney, wall, skylight, vent pipe, and valley — needs flashing. These are the vulnerable joints where shingles alone can't create a waterproof seal, and where leaks most often originate.
Flashing is typically thin sheet metal (galvanized steel, aluminum, or copper) formed into specific shapes for each application. Step flashing at walls. Counter flashing and base flashing at chimneys. Open or closed valley flashing where two roof planes meet. Pipe boots around plumbing penetrations.
When flashing is done correctly, it's nearly invisible and it lasts. When it's done poorly — when caulk is used as a substitute for proper metal lapping, or when pieces aren't overlapped correctly — it's usually the first thing that fails. The majority of localized roof leaks we diagnose in Green Bay trace back to a flashing problem, not failed shingles.
Roof Ventilation: The Part Nobody Sees
Ventilation is arguably the most misunderstood part of the roof system. It's also one of the most consequential for long-term performance in Wisconsin.
A properly ventilated attic has continuous airflow: cooler outside air enters through intake vents at the soffits (the underside of the eave overhang), flows up through the attic space, and exits through exhaust vents at or near the ridge. That airflow does two things.
In summer, it prevents heat from building up in the attic — heat that can bake your shingles from the underside and prematurely age them. In winter, it keeps the attic cold, which prevents snow on the roof from melting unevenly and creating ice dams. Warm attic air that's not being vented causes snowmelt during freeze-thaw cycles. That meltwater runs down to the cold eave, refreezes, backs up under the shingles, and finds every gap in the underlayment and flashing below.
Ventilation problems also cause condensation on the underside of the deck, leading to rot and mold in the attic structure. We see this regularly in older homes across Brown and Outagamie counties.
Common exhaust vents include ridge vents, box vents, and powered attic fans. None of them work correctly without adequate soffit intake to balance the airflow.
The Ridge Cap: Finishing the Peak
At the very top of the roof, where the two main slopes meet, shingles can't just be folded over the peak. That joint needs its own purpose-made covering: the ridge cap.
Ridge cap shingles are heavier and thicker than standard shingles, designed to flex around the ridge without cracking. They're installed in overlapping courses that shed water to both sides. A ridge vent installation integrates into the ridge cap system, with ventilation built into the structure beneath the cap shingles.
It's a small detail in terms of square footage, but ridge cap failure — cracking, lifting, or improperly nailed courses — leads to water intrusion right at the highest point of the roof. From there, water can run down inside the roof system in both directions before showing up as a stain or drip well away from the actual entry point.
How These Layers Work Together
No single layer is the whole story. The shingles shed the bulk of the rain. The underlayment catches what gets past. The ice and water shield handles the freeze-thaw cycle at the eaves. The flashing seals the transitions. Ventilation keeps the whole system at the right temperatures. The deck holds everything structurally.
When one of those layers is compromised — aging ice shield, an unbalanced ventilation system, flashing sealed with caulk instead of properly lapped metal — the others end up compensating. They can only do that for so long.
This is why a quality installation isn't just about shingles. It's about every component being right. Our installation process explains how Pierce Roofing approaches each stage so nothing gets shortcut. And if you want to understand the terminology that comes up on an estimate or inspection report, our roofing glossary for homeowners has plain-language definitions for everything you'll encounter.
What to Ask When You're Getting Estimates
When a contractor quotes your roof, ask about more than shingles. What underlayment do they use? How far do they run ice and water shield? Do they include drip edge and a proper starter strip? How do they handle ventilation?
A contractor who answers those questions clearly and puts the specifics in writing knows what a roof system is. One who can't is worth a second look.
Pierce Roofing has been installing full roof systems in Northeast Wisconsin for over 30 years. Michael Pierce is Atlas PRO+ Platinum certified, and every job is backed by $2 million in liability coverage and a 10-year workmanship warranty. We serve homeowners across Brown, Kewaunee, Oconto, Outagamie, Winnebago, and Manitowoc counties.
Call us at (920) 609-8304 or schedule a free roof inspection online. We'll walk every layer of your roof and tell you exactly what's going on — no pressure, just straight answers.