The Ceiling Stain Is Almost Never Where the Leak Is
Here's the thing most homeowners don't realize until they've already torn into a wall: water doesn't drip straight down. Once it gets through your roof, it runs along rafters, soaks into insulation, and travels horizontally until it finds a gap or a low spot. The ceiling stain you're staring at could be three feet from the actual entry point — or fifteen.
That's why "finding" a roof leak and "seeing water damage" are two different problems. This guide walks through how to actually track down where your roof is letting water in, starting from the inside and working your way out. If you follow these steps, you'll either locate the source yourself or gather enough information that a roofer can find it quickly without spending an hour on your roof guessing.
And if water is actively coming in right now, skip this guide entirely and call for emergency roof leak repair. The diagnostic process is for after things have dried out.
Step 1: Start in the Attic, Not on the Roof
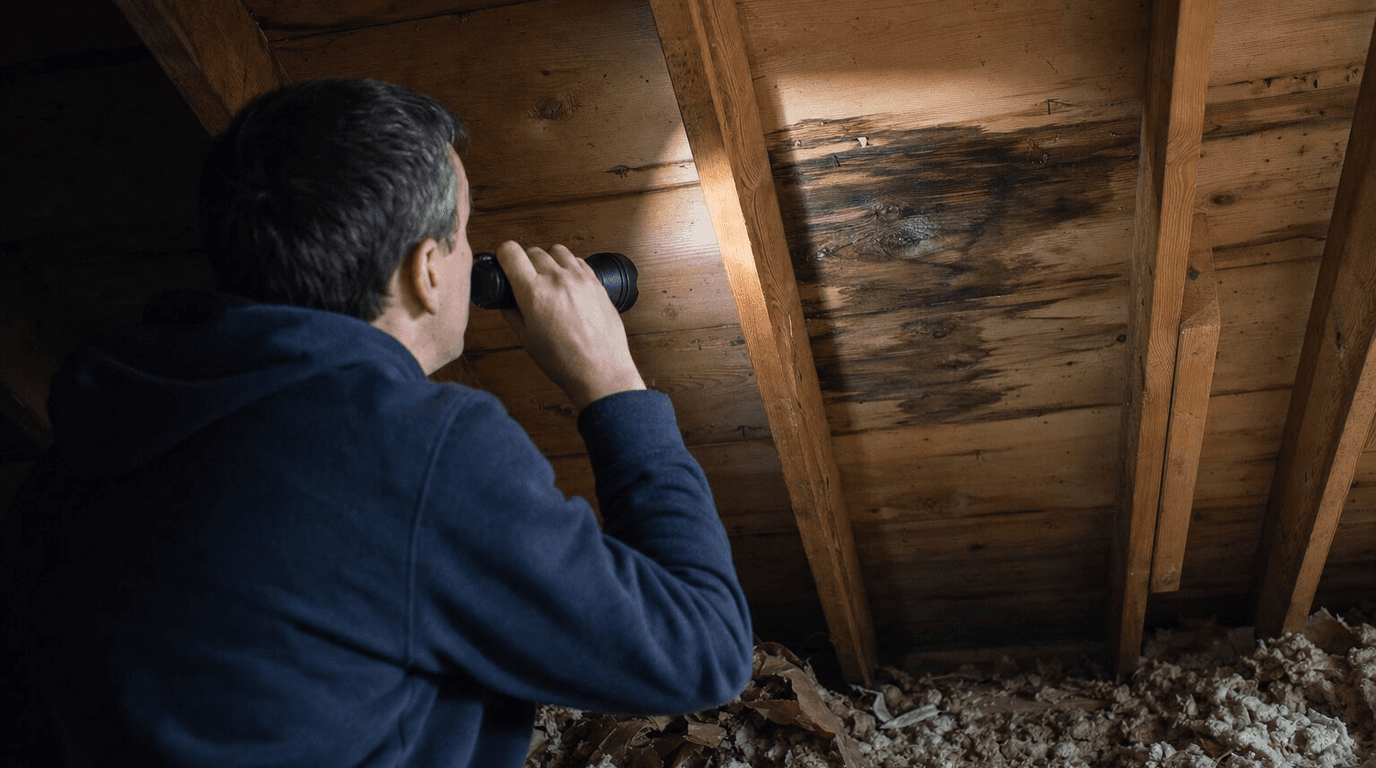
The attic is where most leaks reveal themselves before they ever show up inside the living space. Get up there with a good flashlight during daylight — ideally on a dry day, a day or two after heavy rain so any moisture is still fresh but not actively dripping.
You're looking for a few specific things:
Water stains on the underside of the roof deck. These look like dark streaks or patches on the plywood. Older stains are gray or discolored. Fresh stains are darker and may still feel damp.
Mold or mildew growth. Black or greenish growth on rafters or insulation means water has been getting in for a while, not just once. That's important context for whoever does the repair.
Daylight coming through. In a well-sealed attic, you shouldn't see any light from outside. If you do, that gap is a problem.
Wet or compressed insulation. Fiberglass batts that have absorbed water will look matted and yellowed rather than fluffy. If the insulation is soaked, it's been leaking long enough to matter.
Once you find a stain or wet spot in the attic, mark it with chalk or tape, then measure its distance from a fixed reference point — the ridge, a wall, a plumbing vent. You'll use that measurement when you get on the roof.
Step 2: Trace the Water Path Uphill
This step is where most people go wrong. They find a wet spot in the attic and assume that's directly under the leak. It isn't — it's where the water stopped traveling.
Water follows gravity and the path of least resistance. So once you find the wet spot in your attic, start tracing uphill from there. Physically look up the rafter from that spot toward the peak of the roof. The actual entry point is almost always uphill and upslope from where the stain appears.
Look for any penetration in the roof deck in that direction: a nail that's popped and rusted, a seam in the plywood, a knot hole, an area where the decking looks darker or has a slight depression. In Wisconsin, freeze-thaw cycles can work fasteners loose over a single winter, so don't dismiss a single proud nail as insignificant.
If the attic is too tight to move around in, or if it's fully spray-foamed and the insulation is up against the deck, you may not be able to trace the path. That's when you need to go to the roof surface.
Step 3: Inspect the Roof Surface Methodically
Before you get on the roof, take a slow walk around the perimeter of the house first. You can spot a lot from the ground with binoculars: missing shingles, lifted edges, granule loss in concentrated areas, bent or lifted flashing.
If you're comfortable working at height and your roof pitch isn't too steep, a closer inspection will tell you more. Move methodically from eave to ridge on the section above where you found attic moisture. You're looking for:
Damaged shingles. Cracked, curled, or missing shingles are obvious candidates. But also look for shingles that look intact but have dark patches where granules have worn away — those spots are where the asphalt underneath is exposed and failing.
Flashing problems. This is the most common source of roof leaks in Green Bay, and it's the one people overlook the most. Check around every penetration: chimney, skylights, plumbing vents, and any place where a wall meets the roof. Flashing that's lifted, rusted, or has gaps in the sealant at its edges is a primary suspect. Our related post on roof flashing — what it is and why it fails explains exactly what you're looking for.
Pipe boot condition. Each plumbing vent has a rubber collar around its base. On roofs more than 12 to 15 years old, those collars crack and shrink. Put your hand around the base — if you can feel a gap or the rubber crumbles when you touch it, it's leaking.
Low spots or debris dams. Anywhere debris collects — a valley, a spot where leaves accumulate — water sits longer. Extended contact breaks down shingle granules faster and eventually creates an entry point.
Step 4: Use the Hose Test When You Can't Find It Visually
Sometimes the damage isn't visible. The shingles look fine, the flashing looks intact, and you still can't explain the stain in the attic. The hose test is the standard diagnostic move at that point.
You'll need two people: one on the roof with a garden hose, one in the attic with a flashlight. Start at the bottom of the suspected area and work upward in sections. Soak each section for a full two to three minutes before moving higher. The person in the attic watches for the moment water first appears, and calls up to stop. Wherever the hose was when the leak appeared — that's your zone.
The key is going slowly and systematically. If you start high and work down, or you try to soak the whole section at once, you'll miss the location. Each section needs time. And flooding the roof defeats the purpose — you're simulating rain, not a fire hose.
This test works well for isolated leaks. If you have a roof with multiple failing areas, water can appear to come from everywhere at once, which isn't much help. At that point, the problem is probably systemic deterioration rather than a single entry point, and professional roof repair is the more practical path.
Step 5: Check the Valleys and Eave Edges
Two spots that deserve their own mention because they're consistently missed during DIY inspections.
Roof valleys — the V-shaped channels where two roof slopes meet — carry a significant volume of water. The flashing or underlayment in a valley takes more abuse than most other roof surfaces. If a valley is leaking, water often runs along the valley flashing and enters the attic several feet from where it's visually obvious on the shingles.
The eave edge is similarly underappreciated. In Wisconsin especially, the combination of ice dam damage in winter and gutter-related moisture in spring means eave edges fail faster than mid-roof sections. Check for soft spots, dark staining along the top of the fascia, and shingles that look like they've shifted or lifted at the bottom edge.
Problems at the eaves are often connected to what's happening with your gutters and drainage. If you haven't had your gutters and roof edge looked at recently, roof maintenance that includes those areas is worth scheduling before next winter.
Step 6: Don't Rule Out Condensation
This trips people up more often than it should. Not every water stain in an attic comes from a hole in the roof. Condensation — moisture from inside your home rising into an attic that doesn't have adequate ventilation — can leave water stains, cause mold, and even drip off rafters when temperatures shift sharply.
The way to tell the difference: if the staining appears broadly across the attic rather than concentrated in one area or tracing along a rafter, and if it tends to be worse in late winter or early spring, condensation is a likely contributor. A roof with a single entry point creates localized damage. Condensation is diffuse.
Fixing condensation isn't a roofing repair — it's a ventilation and insulation problem. But it's worth confirming before someone patches a roof that doesn't actually have a hole in it.
When You've Found It (or When You Haven't)
If your investigation points to a specific area — a bad pipe boot, a section of lifted flashing, a few damaged shingles — document it. Take photos from the roof surface and from the attic. Note the measurements. That information will make any repair conversation faster and more accurate.
If you've done all of this and you still can't pinpoint the source, that's not a failure on your part. Some leaks are genuinely hard to find without professional equipment and a trained eye. The point of doing this diagnostic work yourself is to narrow the field, not necessarily to close the case entirely.
And if you know there's a leak but you're not finding obvious exterior damage, check out our post on why small roof leaks become expensive problems fast. The short version: waiting costs more than investigating.
Get the Right Answer Before You Do Any Work
At Pierce Roofing, we've been tracking down roof leaks across Green Bay and Northeast Wisconsin for over 30 years. Michael Pierce and his team don't start patching until they know exactly where the water is getting in — because a repair that misses the actual source just delays the damage.
If you've gone through these steps and want a professional to confirm what you found, or if you'd rather hand the whole thing off to someone who does this every day, we offer free roof inspections with a clear report of what we find. No pressure, no manufactured urgency. Just a straight answer.
Call us at (920) 609-8304 or schedule online at greenbayroofers.com.