What Is Flashing on a Roof, Exactly?
Most homeowners know what shingles are. Far fewer can tell you what flashing is — even though it's one of the most important parts of the entire roofing system. And when it fails, that's almost always where the water gets in.
Roof flashing is thin sheet metal — typically galvanized steel, aluminum, or copper — installed at every point where your roof meets something else. A chimney. A wall. A skylight. A valley where two roof planes meet. Anywhere there's a joint, a transition, an interruption in the continuous shingle surface, flashing is what bridges that gap and keeps water out.
Think of it this way: shingles shed water by overlapping downward, layer by layer, so gravity does most of the work. But at joints and transitions, that overlap logic breaks down. You can't shingle a chimney. You can't overlap a wall. Flashing is the solution — it creates a sealed metal barrier that redirects water back onto the shingle surface where it can drain properly.
Without it, water would pool and seep at every one of those joints. With poorly installed or deteriorated flashing, that's exactly what happens.
Where Flashing Is Installed on a Roof
There are more places on your roof with flashing than most people realize. Here's where it shows up:
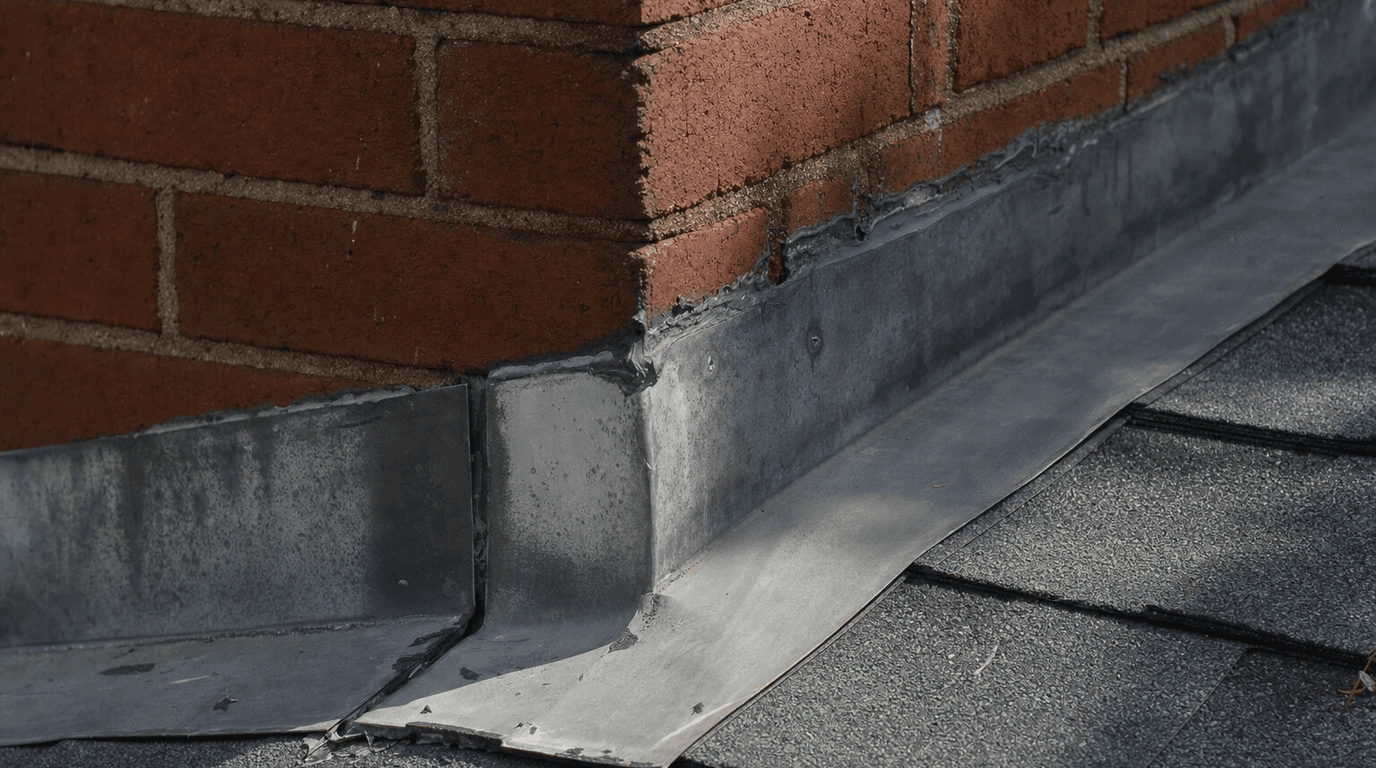
Chimney flashing is the most well-known type. It usually involves two layers: step flashing along the sides of the chimney and counter flashing that's embedded into the mortar joints above. This is also one of the most common failure points we find on older Green Bay homes.
Valley flashing runs along the V-shaped channel where two roof slopes meet. Valleys collect a tremendous amount of runoff — water from two different planes funneling into one narrow strip. Whether it's open metal flashing or woven shingles over a membrane, this area takes a beating.
Step flashing is used wherever a roof meets a vertical wall, like a dormer, a side wall, or an addition. It's a series of L-shaped metal pieces installed in overlapping steps up the wall. Each piece kicks water outward onto the shingle below it.
Skylight flashing surrounds the frame of a skylight and is often the first thing to fail on a skylight installation. Many budget skylight installs skip proper flashing and rely on caulk — which doesn't last.
Vent pipe flashing (also called pipe boots or pipe collars) seals around the plumbing vent stacks that poke through your roof. The rubber boot that surrounds the pipe is particularly vulnerable to UV degradation and cracking over time.
Drip edge flashing runs along the eaves and rakes. It's not a joint sealer so much as a directional guide — it directs water off the roof edge and away from the fascia. If you're in Wisconsin and curious why this matters so much here specifically, our post on why Wisconsin roofs need proper drip edge explains the freeze-thaw angle in detail.
Why Flashing Fails: The Main Causes
Flashing failure causes fall into a few consistent categories. Knowing them helps you understand what you're actually looking at when a contractor tells you your flashing needs attention.
Age and weathering. Flashing isn't permanent. Galvanized steel eventually corrodes. Aluminum can oxidize and pit. The sealants used around flashing — roofing caulk, roof cement, butyl tape — all have a lifespan. In Wisconsin, where we go from below-zero winters to 90-degree summers in the span of a few months, that thermal cycling accelerates the degradation of every material on your roof, flashing included.
Sealant failure at the joints. This is the one we see most often. At some point — during original installation or a repair — someone ran a bead of caulk or applied plastic roof cement to bridge a gap or seal a joint. That works for a while. But caulk eventually cracks, shrinks, and pulls away from the surface. When it does, the seal is gone and water has a direct path in.
Improper installation. Honestly, this is more common than it should be. Flashing that's nailed too tight doesn't allow for thermal expansion, so it buckles or pulls away from the surface. Step flashing that's installed without overlap lets water sneak behind each piece. Chimney counter flashing that's sealed with caulk instead of being properly embedded in the mortar won't hold up through a Wisconsin winter. Installation details matter, and a lot of them get shortchanged.
Ice and settling. In Northeast Wisconsin, ice dams can put serious mechanical stress on flashing. When ice forms against a chimney or along a valley and then shifts as it melts and refreezes, it can physically pry flashing loose. Settlement in the structure — which happens slowly in older homes — can also pull flashing away from its sealed position at walls and joints.
Storm damage. High winds can lift and bend metal flashing, especially at the edges. A branch strike can puncture or crease it. Hail damage that's visible on shingles is often also denting and pitting flashing, compromising its long-term integrity even if it looks okay at first glance.
How to Tell If Your Flashing Is the Problem
Flashing failures produce specific, recognizable patterns of water intrusion. If you're trying to track down a leak, these are the signs to look for.
Water stains near chimneys, dormers, skylights, or walls — especially on upper floors or in the attic directly below those features — are the most telling sign. If your leak seems to be localized around one of those transition points, flashing is the first place to look.
Visually inspecting from the ground with binoculars can sometimes reveal obvious problems: flashing that's visibly bent up or away from a chimney, rust streaking down the roof surface from a metal piece, or gaps where the metal has separated from the wall. But a lot of flashing failure is subtle and requires actually getting up on the roof.
If you're not sure whether your leak is a shingle problem or a flashing problem, our guide on how to find a roof leak step by step walks through how to trace water intrusion back to its source. And for a full picture of the most common leak sources we encounter across Northeast Wisconsin, our post on common causes of roof leaks in Wisconsin covers the full list.
What Roof Flashing Repair Actually Involves
Repair scope depends on what failed and how extensively. Not all flashing problems are equal.
Resealing is the lightest-touch repair. If the metal is in good shape but the sealant around it has cracked and pulled away, a thorough cleaning and application of appropriate sealant can restore the seal. This is a legitimate fix when the underlying metal is sound. It's not a permanent solution when the metal itself is corroded or the installation has a more fundamental problem.
Partial replacement covers situations where one section of flashing has failed while surrounding sections are still serviceable. Replacing the step flashing along one side of a chimney, for example, without pulling the entire chimney flashing system apart.
Full flashing replacement is necessary when the flashing system has aged to the point that patching doesn't make sense — or when there are installation problems that were never right to begin with. This is also what we do during a full roof replacement, because putting new shingles over old, questionable flashing is a mistake that tends to come back around in three or four years.
Chimney flashing repair specifically often involves repointing the mortar joints where counter flashing is embedded. That's masonry work on top of roofing work, and it requires someone who knows what they're doing with both.
For a deeper look at what flashing repair involves and what it costs in the Green Bay area, our roof flashing repair service page covers the specifics.
Flashing and Regular Roof Maintenance
Here's something a lot of homeowners don't realize: flashing is one of the primary things a roofer is looking at during a maintenance inspection. It's not about shingles. Shingles are usually fine. Flashing is where the problems hide.
A routine roof maintenance visit should include an inspection of every flashing location on the roof: every chimney, every wall penetration, every valley, every pipe boot. The sealants get checked. The metal gets checked for corrosion and physical damage. Any sections that are starting to pull away or crack get addressed before they become an active leak.
The math on this is pretty simple. A proactive flashing repair might cost a few hundred dollars. Water intrusion that's been running into your attic for two seasons — saturating insulation, encouraging mold, rotting the decking — can easily run into thousands. Staying ahead of it is almost always cheaper.
For Green Bay homeowners, scheduling a spring inspection after the winter thaw is the right move. Our post on spring thaw roof damage in Green Bay covers why the period right after winter is such a good time to catch flashing issues before summer rains make them worse.
Getting Flashing Right Matters More Than People Think
Flashing doesn't get talked about much. It's not glamorous. You can't really see it from the street. But it's sitting there right now at every vulnerable point on your roof, doing the job that keeps water out of your house.
When it fails quietly over months or years, the damage that follows can be significant. When it's installed right from the start and inspected periodically, it's the kind of thing you never have to think about.
Michael Pierce has been installing and repairing roof flashing in Northeast Wisconsin for over 30 years. Pierce Roofing is Atlas PRO+ Platinum certified, carries $2 million in liability coverage, and backs every repair with a 10-year workmanship warranty. We serve homeowners across Brown, Outagamie, Winnebago, Kewaunee, Oconto, and Manitowoc counties.
If you've got a leak you can't explain, or you haven't had your flashing inspected in a few years, call us at (920) 609-8304 or schedule a free roof inspection online. We'll tell you exactly what's going on and what it'll take to fix it.